Thursday, December 24, 2015

Skylines: 1989 R34 rolling chassis


A few hours concentrated effort got the second Skyline to the point of a rolling chassis. Most of the interior is painted and just needs assembly. I had previously finished painting the body at the same time as the 1972 which is one of my cleaner efforts.

So nothing to report beyond the fact that it is the usual Tamiya kit: goes together well, looks good. The 1972, however, looks better partly because there are lots more interesting engine bits like carbs, distributor, etc. As well the 1972 seemed to have lots more detail; for example the intake manifold and turbochargers on the 1989 do not connect to the intercooler which is a bit disappointing. Also most of the underhood bits are black so not a lot of contrast.

In any case, as a gentle start to the modeling season, it is far better than the disastrous attempt at painting the BRE Datsuns!

There probably won't be much time for any further news until I get back from the holidays, say mid-January. Happy holidays to you all out there on the InterWeb.

Wednesday, December 23, 2015

BRE Datsuns: One step forward, two back (and I haven't even started yet!)

OK, so first time back at the bench since late spring, and looking around for a suitable project to get going again, I settled on the BRE Datsun 510 and 240 Z from Revell. These were successfully campaigned by Pete Brock, with John Morton at the wheel, in the Trans Am sub-2.5 litre class way back when. The colour schemes being identical, I thought I'd get the bodies prepped and painted before tackling the bits I like best, namely the engine and chassis. That way the paint can harden before I need to handle it for final assembly.


The 240 Z kit involved some poor fits, such as the rear panel and nose to the body; there will be some putty here. The 510 fits are better but both kits involve a fair amount of scarf, flash and mold lines to be dealt with, possibly reflecting the age of the molds. Additionally the 510 body mold is very thin and flexible, and I can imagine it being easy to fracture it. All went well, however, including the Tamiya primer, until I got to the basecoat of Tamiya white which immediately pooled and ran in little puddles everywhere. I suspect the contents of the can, which is old, had separated and I didn't shake it enough, so the spray was mainly solvent.

So for the record: there is lots out there on stripping Tamiya paints, most of it contradictory. Tamiya thinner lists n-propanol and butyl alcohol as the contents; alternatively you can get rubbing alcohol, a.k.a. iso-propanol (not quite the same as n-propanol, granted) at 99% concentration at your local pharmacy. Soak the parts in a tray. Cover the tray to minimize evaporative losses; I used a large freezer bag for this. If the paint is fresh as it was in my case, an hour should do; you'll need to put on rubber gloves and scrub with a toothbrush to get it all off. Wash it all in soap and warm water, and either save the remaining iso-propanol for future use, or pour it down the drain with lots of warm water and soap.

As the next couple of days involve the usual family dinners, and as I will be away for another 10 days, that puts an end to any modeling until well into January. Oh well.

Moral of the story: always buy new paint cans! Or use an airbrush, which is an added level of complexity I am not prepared to get into at this stage.

All the best of the season to any readers out there.

Saturday, December 12, 2015

Hobby shops

In earlier blog posts I've mentioned Wheel & Wings in Toronto, and Magic Box Hobbies in Vancouver. Today I stopped by Udisco, the biggest hobby shop in Montreal and a wholesaler for the region. Located here in a rabbit's warren of warehouse-like little passageways off the Decarie expressway, it covers RC airplanes and model trains as well as plastic kits. The old fellow who is usually at the counter wasn't there; he hadn't been looking well the last few times I had been in. I asked the young fellow at the counter and found out that he was the son, that the old fellow had passed away after a couple of years of serious illness, and that the funeral was yesterday. So very raw obviously, and I offered the family my condolences as I left.

The father had been in the location for 50 years and loved the business. Hopefully the family will figure out what to do with the business; it's all pretty antiquated in terms of customer service or ordering things, and a few of the "employees" are real characters and probably generally unemployable elsewhere. I wonder whether it has been turning a profit or just paying the rent and keeping Dad out of trouble ... If you're in the area, drop by, offer your condolences and buy something just to encourage them. The company is a wholesaler but is open to the public.

So what did I buy? I was looking for two items in particular. I grabbed the last copy of Revell's BRE Datsun 240Z, to go with the BRE Datsun 510 I bought last year and haven't started yet. The two are a pair. The 'B' in BRE stands for Pete Brock who campaigned these successfully in a range of SCCA club races way back when. Brock is also venerated, make that worshipped, as the guy who penned the Cobra Daytona Coupe for Shelby ... still one of the half dozen or so sexiest cars on the planet. How he wound up running a boxy 510 in the SCCA system, after coming up with that curvaceous beast, is a mystery.


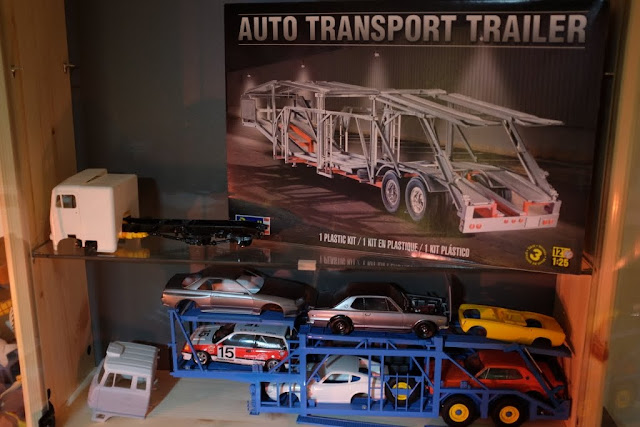
I picked up a copy of Revell's car carrier trailer which fits US cars and will make room in the shelving along with the Mitsubishi car carrier I described previously. I've got a Freightliner truck, started but incomplete, to haul it.


I also bought AMT's '51 Chevy, which has a stovebolt 6 with a 12 port head, instead of the usual V8. I've built enough small blocks, it's time to build other stuff. This will serve as a donor for a chopped and channeled resin body from Jimmy Flintstone that has been sitting on the shelf for some time now.


Finally I took a chance on a set of 4 wheels and tires meant for RC planes. The objective is to replicate big flotation tires as used in Iceland, to fit under the Jimmy Flintstone resin kit of the '55 Chevy Suburban. At 1.75" diameter, they work out to 42" at scale, which is about right; however the width, at just under 3/4", is only 18" at scale, a bit narrow. We'll see how it works out. I've already got the '57 Cameo donor kit and can probably scrounge a 4X4 system from the parts bin; now I just need to get going.


And there is the problem: getting going. The weather in Eastern Canada has been very warm this fall; we've beaten record after record and there is no snow on the ground. So the hibernation instinct that drives us all indoors to the workbench has not kicked in yet.

Monday, December 7, 2015

Fujimi Porsche 917K

Whenever I am in Vancouver, I try to drop in on Magic Box Hobbies (Arbutus and 37th, here). While most of the stuff is RC or military, there is always an oddball selection of Japanese 1/24 kits, sometimes neat out of production items.

Most recently they had a copy of the Fujimi kit of the 917K, in the 1971 Martini Rossi livery as run at Sebring (Car #3, driven by Elford and Larousse to the win). On opening the kit, which was taped shut but not shrink-wrapped, it turned out to have the optional extra photoetched detail sheet including disc brakes, windshield wipers, lots of little bolts, window surrounds, etc. So clearly it came from a close-out somewhere. I bought it because for some time I have had the more detailed version of the engine for this car, made in resin by Historic Racing Miniatures, and I was just waiting for the kit to surface.


So I now have two 917Ks, the other being one of the super-detailed multi-media from Model Factory Hiro. Now I just need to find time to actually build something ... the career, which admittedly permits me to fly to Vancouver to buy obscure kits, is becoming tedious, and close friends are showing a disturbing propensity for getting sick. So maybe it's time to stop accumulating money and start enjoying life. To be continued ... meanwhile the rough
count is 9.4% WIP (12 kits), 41.1% complete (53) and 48.8% not started (63). For the keeners out there who have added this up and come to 99.3%, there is one unopened kit not included in the total: the Mecom Lola T70 in the original shrink wrap with original price tag of $1.83, marked down from $2.00. It's a definite have your cake and eat it moment: do I open it and build it (or at least gawp at it), or save the wrapping ... decisions, decisions.


So: as the Game of Thrones fanboys would say, Winter Is Coming, so maybe I'll get some building in soon. Stay tuned.

Monday, July 13, 2015

Monster tires

Summer in Canada ... long twilit evenings sitting on the deck, swatting mosquitos in hot humid weather while trying not to spill your beer into the pool. What could be nicer.

Well, I spent two weeks in Iceland where the sun, technically, 'sets' at about 00:15 and rises again at 01:15, but where it doesn't actually get dark in June or July, mainly because Reykjavik, the capital, is at 64 degrees north. Sort of like Anchorage, Alaska. Very freaky ... but mainly there are no mosquitos.

What they do have is monster trucks.

The country is crawling, literally, with trucks running big suspension and high flotation tires for off-road expeditions to glaciers, fording streams or crossing lava plains full of sharp rocks in the interior, etc. I have never seen so many off-road capable vehicles in any one spot other than a meet.


I really like the shot of the Ford Expedition next to the mini-bus. A lot of perspective there: 21 people in the minibus but limited to pavement, or 7 people in the Expedition but let's go anywhere.


And the tour bus on Mercedes Class 8 chassis, with 5 axles and lots of tire, is pretty impressive too. Probably seats 40 ...


There were lots of Land Rovers but plenty of Japanese or US stuff as well, even a number of jacked-up  Mercedes mini-buses.


At least one Ford E-350 van sported a tag proclaiming Quigley 4X4 conversions with a 1-800 number that would probably not work outside North America. http://www.quigley4x4.com/ turns up in a Google search but the link doesn’t work ... Note in particular the stretched 6-door Ford Expedition with F350 running gear. It must have cost a fortune to build that one. (The Model A in front of the Hotel Geysir was pretty neat too).


I watched the driver of a Nissan 4WD crawl by me up a snowy slope in first gear, low range, the driver keeping the diesel just above idle with his left foot off the clutch, moving slower than I could walk up a 15% to 20% grade in deep slush, each wheel in turn trying to slip and being caught by one of what I have to assume was a full complement of limited slip or locked diffs. The most challenging parts required getting out to let more air out of the tires; he had a big battery operated compressor in the passenger footwell for reinflating these monster tires as needed which appear to carry two tubes (at least there were two tire valves, side by side, in each rim). Very impressive, not just because he was delivering our food supplies to our mountain huts.


So I've got Jimmy Flintstone's 1955 Suburban resin body, and AMT's 1957 Cameo is on order; now I just need the tires. Big donuts with minimal tread, not the tractor tires as in arena truck meets; to be continued.
 
Meanwhile I avoided the hot and sticky weather back home by staying in the cooler garage and building a paint booth with extraction fan. Cost so far, for the fan, 1/4" plywood sheet and wiring, is about $20; now I just need some dryer hose and a cardboard box. Pictures to come. Bring on winter, baby! Time to start building again.


Saturday, May 30, 2015

Summer doldrums, 300 SL

It being summer in the northern hemisphere, all us daylight-deprived Canadians are hanging out on the deck with a couple of cold ones well into the night, taking advantage of those long summer twilights that you don't get further south. (I suspect Minnesotans and others from the northern Mid-West states probably feel the same way).  During the day we are madly running around hiking, canoeing, biking, running and participating in all kinds of other sports where we can actually go outside without having to put on a parka and three pairs of socks. So indoor activities, such as modeling, tend to grind to a halt until the flying, freezing slop returns in October or November.

That doesn't mean that the credit card needs to grind to a halt. The latest addition is Tamiya's excellent Mercedes-Benz 300 SL. The complex tubular chassis is very well done, in what seems to be a more flexible and less brittle styrene formulation than I am used to; it's a shame that it isn't really visible once the car is complete, in spite of the clear undercarriage. I am tempted to build and exhibit the chassis separately from the body, which will require covering up the gearbox and differential which are hollow and not meant to be viewed from above. 


For the mid-50's, the 300 SL is an interesting mix of old and new. The straight six, with overhead cam and fuel injection, is state of the art for its time, except for the siamesed exhaust ports for cylinders 1, 2, 5 and 6. The suspension, while independent all around, is by swing axles at the rear, and not even MB's novel low-pivot swing-axle. This was used on the later 280 SL and the big sedans up to and including the classic 300 SEL 6.3. The picture below is a good shot of the low-pivot system, which actually works surprisingly well, and which thus represents the triumph of detailed, focused German engineering over a single bad design decision made at the outset. Sort of like the 911 with its engine hung out the back.

 
Mercedes didn't switch to a proper independent rear until 1968 with the smaller 280, and 1972 with the 450 S-class.

With 70 kits either incomplete (about 10) or unstarted (about 60), many of them very challenging builds requiring much custom work, I figure I've got enough work for about a year and a half if I work at it 40 hours a week, 50 weeks a year, with two weeks off at Christmas. The career, however, is already taking up 2000+ hours a year, so clearly this will only get going for real once I retire.

Not that I am complaining; the career brings in cash that allows me to buy obscure stuff, not to mention new IKEA shelves to put it all on. If my boss is reading: Hooray for the career!

Saturday, May 16, 2015

Abarth OT 1300 and other recent acquisitions

As noted in previous posts, I should probably stop buying new kits while I catch up on the backlog of incomplete or unbuilt kits.

Yeah, right.

Two packages turned up in the mail yesterday. The most interesting one was Model Factory Hiro's Abarth OT 1300, in the version commonly known as the 'Periscopio', due to the funny little scoop mounted on the roof to feed cool air to the cabin (or the carbs, as some web sites claim, but the photographic evidence supporting this assertion is a little thin).

Now faithful readers will recall my struggles with MFH's Porsche 908/03. This has proved to be a major challenge, with a huge number of white metal bits, such as chassis tubes, that are easily bent out of shape, and that have miniscule little dowels that are way too easy to shear off when you try to fit them into equally small sockets, and which are thus very difficult to get right. In fact the last post on this kit was November 2, 2014 (here) when I mistakenly concluded that Mr Carpet had eaten one of the warning lights on the dashboard; as a result I set the 908/03 aside in order to actually finish something. I also have MFH's 917, which I have not started but which looks to be equally challenging. So buying the Abarth was a bit risky.

No worries, however; at first glance the body and chassis consist of two very nice molds, complemented by front and rear opening body pieces that fit very well indeed at this early stage. There are a lot of white metal bits but most are engine or suspension related; it looks to be a much easier build (although still not for the faint of heart).


Why the Abarth, you ask? Like the Alpines, it is an obscure, very attractive little car, and obviously channels the singular passion and vision of the founder (Carlos Abarth in this case). It is iconoclastic, uncompromising and unique. As with a lot of Abarth creations, it is loosely based on cheap Fiat or Simca sedans of the late '50s and early '60s. In particular it has a water-cooled 4-cylinder motor hanging out the back, a short-stroke, twin-cam, twin-plug 1290 cc little bomb making an estimated 145 horsepower, all of it probably available in a sudden onslaught between 4500 and 6000 rpm.


Note 145 hp from 1290 cc is 112 hp/litre, or a whopping 1.84 hp/cu.in. Without a turbo. Like I said, a little bomb. A 327 cu.in. Chevy small block would need make 600 hp to match this specific output.

Supercars.net has a few photos but clearly they are of at least 5 different cars. I assume there is an official Abarth history out there somewhere, complete with serial numbers, but I am fully expecting the production numbers for this car were low (50 units to meet homologation requirements, according to Supercar.net) and that no two cars were alike. Going on the instruction sheet (which includes colour photos of one particular 1:1 car taken in a yard somewhere in 1993), I would assume the kit attempts to replicate this car.

At the same time, I ordered a kit of the gorgeous Aston Martin DB4 Zagato, but this unfortunately is out of stock. I've enquired as to the availability of the Cobra Daytona Coupe, but no reply yet. These two cars, along with the Jaguar D-Type and Ferrari 250 GTO, are rightfully the sexiest cars on the planet.

The other package included an out-of-production Monogram model of a 1985 Mustang IMSA GTP car with a turbocharged 4 cylinder motor, a resin 1955 Chevy Suburban body from Jimmy Flintstone that needs a '55 through '57 Chevy pickup kit to complete, and finally the well-known and very detailed Accurate Miniatures McLaren M8B in Lothar Motschenbacher trim. The 36-page instruction book (this is definitely not a 'booklet' or a 'sheet') includes such items as 'Now let it dry and just stare at it'... Model Car Garage offers a photo-etched sheet with added detail bits which I will try to track down.

Excluding the assortment of Jimmy Flintstone bodies, most of which are lacking a conventional kit to supply chassis bits, the completed models are now out-numbered by the incomplete ones by 69 to 53.

Sunday, April 26, 2015

Renault 40 Record: opening up the left-side door

As noted previously, the Record came with the left side door molded with the body, but is also supplied with a separate door. Using the new door means cutting out and discarding the old one. With the narrow windows and the tall slab body sides, this is really the only way to show off the interior. (Pictures here; the text is in French but the picture portfolio speaks for itself).


Given the thickness of the mold, this was not going to be a case of gently carving out the seam with the back of a No. 11 blade, as the blade would eventually get jammed in the cut. So I got brave (given the price of the kit) and used the cut-off tool on my Dremel to carve off the old door.


The result is not at all bad, even if the window frame in the old door had to be sacrificed.

Next will be to build hinges as in the article by Ken Hamilton in the April 2015 issue of Scale Auto. Most of that article focuses on hidden hinges (the case study is AMT's 1962 Thunderbird convertible), but he provides a quick overview of 'barn-door' hinges with a 1934 Ford as the example, and this is the approach I'll take with the three hinges used on the Renault.

That being said, an initial attempt using 1/32" brass rod and 0.003" shim stock has only been moderately successful. The 0.005" stock seemed excessively stiff at first look, but it is possible that this is a good thing; experimentation continues. Hamilton recommends 'shim stock' but doesn't specify thickness. (The picture also shows clearly the cleanup needed around the door and opening).


2015 Nissan GT-R Le Mans

Unlike F1, Le Mans has a very liberal policy around race car engineering.

They're not quite there yet, but I think the model where you run what you want as long as you can finish the race on a set number of BTUs is the way to go. We’d see Pratt & Whitney helicopter gas turbines fueled with Jet A, 27 litre Allison V12 aircraft motors redlined at 1500 RPM and running on 105 octane avgas, 1 litre H16s screaming along at 30,000 RPM on a mix of methanol, nitrous oxide and toluene, 7 litre 2-stroke V-twin turbo Diesels running on home heating oil, whatever. You run out of BTUs, you’re out. Energy recovery suddenly becomes very important; photos of ceramic disc brakes glowing a dull orange as the driver desperately tries to dump precious BTUs heading into a corner are a thing of the past.

The bicycle racing arena is at least as rigid as F1. The rules for the Tour de France are extremely restrictive; I recently bought a road bike with hydraulic disc brakes which will outperform a TdF bike, but which the TdF riders can’t have because they stop too well. The argument is that if the guy in front of the peloton has hydraulic discs, and gets on them hard, he’ll be crushed by the pack behind him relying on Victorian-era cable-operated rim brakes that haven’t been improved since Tullio Campagnolo patented the quick-release hub in 1930. The string of Jaguar wins at Le Mans in the '50s were due entirely to two factors: Jaguar's adoption of disc brakes, and the refusal of some Italian guy named Enzo to do the same. Ferrari's high-revving, short stroke motors were decades ahead of the long-stroke Jaguar motor that were inspired by pre-war GP engines, but being able to brake later and harder was the trump card for wins by a string of C- and D-Types.

I once drove a car with cable brakes. It was a ~1950 Dellow trials car, and probably weighed about 600 kg. With a Ford Prefect 1172 cc (yes, that's 71.5 cubic inches) flathead motor augmented with a custom high compression head (I am going to guess 6.8:1 versus the standard 6.3:1) from one of those British ‘hot rod’ shops whose name escapes me now (Speedwell?), it probably made about 31 hp, and the three speed non-synchro box was geared for a top speed of well under 40 mph. Even in these circumstances the brakes were well and truly frightening, the inadequacies only matched by the thermo-siphon cooling system that could not handle repeated 0-30 mph sprints away from lights without boiling, which prevented me from further stressing the brakes as I had to pull over for a rest on my way back to the shop. A good thing too as I was probably additionally stressing the splash lubrication system, said splash lubrication system probably being the inspiration for the Briggs & Stratton 8 hp lawn mower engine, which is where it belongs. I would not have wanted to run the big ends on a customer car.
 
But I digress. Getting back to Le Mans: Porsche is running a V4 Diesel, everyone in LMP1 has hybrid systems, it’s getting very weird. But wait, it's about to get a lot weirder, to wit: Nissan is preparing a 3.0 litre turbo V6 making 625 hp for this year’s race. Pretty conventional so far; however it will be front engined (!) and FWD (!!) which is wild and crazy indeed. The advantage, they hope, is massively improved aero: air gets pulled in from underneath the front splitter, is routed through the forward engine compartment for heat management, and flows through large tunnels either side of the cockpit to the rear of the car, where it exits through what looks like an HVAC hot air vent off a downtown high-rise. The car has none of the usual vents, ducts, scoops, tabs and other drag-inducing stuff you find on the surface of the usual rear-engine cars; skinny little rear tires complete the picture, and the lack of an engine and transaxle  in the rear means the airflow is not constrained by mere mechanical bits. It will be interesting to see how many aero add-ons get pop-riveted onto it as they get the car ready for Le Mans, it’s all pretty sleek now.

According to Road and Track, Nissan will store power in a pair of flywheels under the drivers’ seat. Initial planning was for an added 1375 hp from the flywheels in 3-second bursts for a total of 2000 hp (!!) on tap at the exit of a corner. For reasons of reliability, they now have settled on only 625 hp from the flywheels, so a mere 1250 hp at peak (!). Yoiks. Let’s hope it all holds together.

Meanwhile F1 is back to 2.4 litre V6 turbos limited to 15,000 RPM, and NASCAR requires a pushrod (pushrod!) 368 cu. in. Chevy small block derivative with a restrictor plate under the carburetor (carburetor!). Seems to me the Chevy small block, while an excellent design, dates to about 1957, while the carburetor is a 19th century invention. Where's the innovations, guys?
 
So anyway Profil 24 has wasted no time in preparing a 1:24 model (possibly curbside) of the Nissan. I'm not sure how they do it but they do seem to have figured out what I need in my collection ... They are also preparing a model of the Aston Martin DB2 that ran in 1951 which I will tackle just as soon as I complete the DBR1 that Shelby used to win in 1959.
 

Wednesday, April 22, 2015

Miller 91

One last back-ordered item turned up earlier this week: the lovely little Miller 91 from Historic Racing Miniatures. It's tiny next to the leviathan Renault from the same period; more on the scale of the little Honda RA272E of 1965.


It illustrates that there is nothing new under the sun: the Miller 91 had a 1500 cc, DOHC supercharged motor making up to 250 hp, in a front-wheel-drive chassis. Honda Civic hot-rods, anyone? The name relates to the displacement; 91 cubic inches is just about 1500 cc. I'll build it up to mimic the Packard Cable Special as found in the Smithsonian collection; this is the car Ralph Hepburn ran in the 1929 Indianapolis 500, and which later set speed records of 143 mph (230 k/h) in Europe. Contrast this with the Renault's 9 litres and 130 hp, which was the last gasp of the Edwardian automobile era.

Unlike today’s blown motors, it only had two valves per cylinder, probably at least partly due to the fact it was an inline 8 cylinder with a bore of only 55.5 mm, limiting valve area. (It was a typical long stroke prewar motor, with a stroke of 76.2 mm). Also it had a centrifugal blower as the metallurgy for turbos wasn’t there yet, even though GE put a turbo on an airplane engine in 1919 in a bid for a new record of 28,500 feet. Nonetheless over 200 hp from a 1.5 litre motor, in 1928, is incredible.
 
The kit is gorgeous, with lovely pre-wired wheels and very high-quality resin bits. The instruction 'manual' is a little thin on pictorial detail but this is what you get from a one-man operation. The box has the handwritten notice 47/100, so I am assuming the current run is at least half sold by now; I ordered it in late December (from www.stradasports.com) and was told it would ship as kits got made. Get your order in now! 
 
With this delivery, there is nothing left on backorder. The count now stands at about 53 kits complete, 55 unstarted, and as many as 10 in progress. Time to start building and stop buying.
 
OK, OK, who am I kidding. I'll continue buying as oddball stuff crops up. I just added a Lancia Delta S4 from the 1986 Monte Carlo, recently reissued by Profil 24; I've got 9 or 10 of their kits with only two (DBR1 and Renault 40) even remotely started.
 

Sunday, April 19, 2015

Renault 40 Record: cleanup

Summer is coming and I will be out on the bicycle a lot more frequently, not hanging around the workshop. As a last modeling gasp, I cleaned up the Renault resin bits with the required isopropanol bath, and spent some time filing and sanding to get the upper and lower halves of the body to fit together as intended.


The kit includes an extra left-hand door which requires cutting out the existing one. This will be time consuming given the thickness of the mold. What a long, thin vehicle ... part of the issue is the typical Renault approach at the time, of mounting the radiator behind the motor. I am not sure where the heat got dumped -- into the cockpit? -- but it sure does make for a long, narrow hood, along with the tall, narrow, low-revving, long-stroke motor. Period photos show the rear of the streamlined body was filled mainly by the gas tank, illustrating what the fuel consumption of a 9-litre engine making only 130 hp must have been.

Primer and paint followed. Tamiya AS19, Intermediate US Navy Blue, seems to be a good approximation of the matte fabric panels aft of the cowl, especially with a coat of dullcote. The hood and chassis will be the same colour but with a coat of gloss. This went over a coat of DupliColor primer and another of Tamiya primer.


All this prior to heading out this morning to visit The Granddaughter on my bike, an 80 km loop. What a cutie, even if she is in full Two-Year-Old Tantrum Mode. Work beckons Monday so progress will be slow.

Monday, April 6, 2015

Shelf improvement

IKEA Canada has these cabinets: http://www.ikea.com/ca/en/catalog/products/00282250/. With 3 shelves, roughly 27" wide by 7" deep by 9" high, there should be room for the Mitsubishi car carrier and up to 4 shorter trucks. Of course I've got 6 shorter trucks, plus the Freightliner which doesn't have a trailer yet, so clearly I was going to need two.

So I went out and battled the Easter Monday shopping crowd and picked up two. They go together well and they look good in solid pine. Shelf depth inside the doors is 6-1/2", shelf height varies from just under 8-1/2" to almost 9", but the inside length is only 26-3/8", likely almost an inch short if I want to fit the Mitsubishi tractor in there on the same shelf as the carrier. Presumably the Freightliner with the upcoming Revell car carrier will be even worse. However it is better than what I had, and opens up space to buy and build more stuff. Most cabinets, at IKEA or elsewhere, are made for showing off Grandma's serving dishes and are therefore too deep. These are a very nice solution if you've got lots to display; with a bit of handiwork you could add three more shelves and get 13 feet of linear display space suitable for vehicles under 4" high.


As I keep telling the kids, I could be spending their inheritance drinking, gambling, smoking and chasing women in bars, but I'm not, so they shouldn't complain about the occasional kit and associated impedimenta such as cabinets.

Sunday, April 5, 2015

Mitsubishi Fuso carrier: Mission Creep

The carrier is now complete. I left off a series of little chain-link guardrails on the upper deck that wouldn't stop you from falling. I also mounted the forward upper deck section much higher than the instructions called for; the way it was set up, there was only room for one car at the front for a total of 5. At this point it will hold 6. (The yellow body on the front upper deck is the diminutive Honda S800).


The lower deck falls between the wheel arches and is pretty narrow; the RX7 body won't fit because its wheel arches are too wide. The orange Skyline 2000 fits up to the rear wheel arches, which are also too wide. The overall width of the trailer works out to 102" at 1:1, so even with the single wheels, there isn't a lot of room. Furthermore, the rearmost lower deck position is such that I am not sure that you could actually get out of the car, even if it did fit.


I see there is an upcoming re-release of the Revell auto transport listed on the Model Roundup page (http://www.modelroundup.com/product-p/rmx-1509.htm). Presumably the overall width is similar, but the lower ramp rises above the dual wheel sets so that much wider cars (such as, for instance, 1959 Impalas) might fit on the lower deck.

My existing cabinet will just take the trailer and six cars, plus three more short ones in front of it at 'street' level, if I take out a shelf that used to hold at least 6 cars. Plus the Mitsubishi tractor doesn't fit. So I am replacing space for at least twelve cars with a trailer and at most nine cars. One step forward, two back ... I think I'll need to build or look for a bigger cabinet as there is an incomplete White Freightliner on the shelf, which will need space, especially if I build it with the new Revell auto carrier ... Not to mention the stash which includes a Bedford OLBD 5-ton dropside, a Bussing 8000 S13, a Krupp Titan SWL 80, a Ford LN8000 car carrier and a Dodge A600 cab with Little Red Wagon on a trailer, all waiting to be started. We're looking at a whole lot of mission creep here.

Saturday, April 4, 2015

Mitsubishi Fuso car carrier: carrier and engine

Any Easter blossoms in this part of the world are usually imported from somewhere else. Once the snow does melt, which the meteorologists continue to claim will indeed happen sometime before the end of June, modeling progress will grind to a halt as we all rush out to get a few rays of sunshine before winter starts up again. So the long weekend was a good opportunity to make some progress.


The car carrier required an entire rattle can of Tamiya's TS-10 blue, and will need at least another two cans, along with the half-can left over from the Alpine A220, for the second coat and for the truck cab. As expected there are nooks and crannies where the rattle can doesn't reach now that I've assembled the structure, but a second coat should help here. I am also considering where I might add yellow highlights, to both cab and carrier, beyond the wheels.


Speaking of the wheels, the Tamiya TS-16 yellow rattle can did a poor job on the wheels in spite of a coat of primer, with the paint pooling in little puddles and running away from sharp edges rather than sticking properly; most of the small detail such as lug nuts got buried in yellow muck. Probably I laid on the primer too thin, and the first coats of colour too thick ... I tried to strip it off and start over, planning to put on a heavier coat of primer, but discovered that nothing seems to attack dried Tamiya acrylic paint: not Easy-Off, not lacquer thinner (which probably shouldn't have been a surprise), and not Tamiya thinner which, according to the label, consists of n-propanol and butyl alcohol. The InterWeb is full of advice (as always); the consensus seems to be that iso-propanol at high concentrations, combined with long soaking times (days?) and vigorous scrubbing with a toothbrush, will do the trick. I reinforced the Tamiya thinner with some iso-propanol from the pharmacy, and covered my tray to minimize evaporative losses. After letting it all soak for a couple of hours, vigorous scrubbing with a toothbrush began to lift some of the paint off.

Judging by the smell when I opened the little baggie, the tires are real rubber. (Now there is a sentence that could be misinterpreted -- smelling the contents of little baggies as a quality control measure? If the NSA is listening, we are talking about model cars here. Nothing illegal as far as I know ...) They are very soft and flexible and fit nicely over the rims.


Moving onto the truck, the engine is a bit of an oddball. It is assembled from a series of relatively flat sheets, with large gaps in random places between joints, see below. Compared to the lovely interlocking bits in the trailer, it's all pretty sloppy in terms of identifying where exactly a part should be glued, and the detail is only fair. It appears to be a V10 Diesel with no turbocharging. The pictures above show it pre-painting; I stripped the chrome off the cylinder heads and gearbox. In one of the few bits of English, the instructions say the engine should be painted 'burnt iron'; I'm going to look for something a little more colourful even if not entirely accurate.


Saturday, March 28, 2015

Mitsubishi Fuso car carrier: carrier assembly

In trying to make more room in the display cabinets, and also as a way of avoiding the finicky finishing touches on the Mazda 787B (funny how a lot of my new projects begin as a way of avoiding finicky finishing touches on something else ...), I ordered the Fujimi model of the Mutsibishi Fuso car carrier from a Japanese provider here. The idea was to use it as a display platform for the growing contingent of Japanese sedans in the collection, so that 5 or 6 cars might take the place of three, plus there would be a neat (and obscure) truck to add to the collection.

The package arrived quickly and in good shape. It wasn't exactly cheap, at 12,000 yen (of which 4,000 was shipping); but the strength of the US dollar versus the Canadian dollar makes it painful to order anything from the US these days. The site actually shows images of assembly drawings, so you can find out pretty quickly whether the model is curbside or not, a real problem with some of the more obscure Aoshima, Fujimi or other Japanese kits that are available in North America. (The Fuso has a well-detailed drivetrain and a tilt cab).

Meanwhile I also discovered a Japanese hobby shop in Vancouver (here) which may be able to order this obscure stuff; while the stock they carry is mostly R/C and military, there were some out-of-production Japanese kits on the shelf and I came home with Tamiya's Honda S800.

The trailer sides and lower deck went together quickly, with a very nice socketed design to ensure components going together at right angles actually do all stay straight. Instructions are almost entirely in Japanese but it's all pretty obvious to anyone who has built a few styrene kits. The upper deck will be assembled once some other components, such as hydraulic struts, have been painted separately. It will go to painting next. I think a light blue, with yellow accents, will look good.


Of course, now that the trailer is assembled, I realize it doesn't fit in any of my cabinets -- too long for some, too tall for others. As I have a few other trucks sitting in the wings, it would appear that I'll need a new display cabinet anyway ...

Mazda 787B: Body

One of the most painful parts of the Tamiya kits, especially older ones, is the windshield surrounds that need to be painted directly on the glass. You need a real steady hand with the older kits; if you screw up, it's forever. The newer ones have a mask of the right shape and so are much easier.

So without a mask, and given the success of Microscale products in other applications (Micro Set for setting decals, Micro Kristal Klear glue for glass), I decided to give Micro Mask a try.

It is supposed to be a liquid mask that you paint on and let dry; then you paint your colour and peel off the mask after the paint has started to set.


It goes on in a thin, transparent blue layer. Trimming is a challenge as you need to drag the knife exactly where you want it, almost as challenging as dragging a brush exactly where you want it. I let the Micro Mask dry for a few days while my career got in the way, then slathered on some paint. After about 20 minutes I used a knife and tweezer to lift the mask off. The good news is you can really slather on the paint; the bad news is that it still looks sloppy, possibly because I didn't put on the Micro Mask thick enough or trim it properly. I'll have to go around it again with the brush one day when I am feeling particularly relaxed. So is there a benefit? I'm not sure -- either you need a steady hand with the Micro Mask, or a steady hand with the paint brush. Skip a step and go right to the paint would be my conclusion at this point.


Otherwise I decided to apply a couple of key decals but to forego the entire slate of green triangles and tacky sponsor's logos. Yes, it is not exactly as it ran in 1991, but it's not as ugly, either. Paint consists of clear over the bare orange plastic, a basic approach that works well with my typical level of finish. The decals for the tires appear to be missing (the kit has been open for quite a few years), so I'll have to see about digging something suitable out of the parts box or off the InterWeb. With the US dollar where it is, ordering from US suppliers in Canadian dollars is becoming painful even before the extortionate shipping costs, so I'll have to see what I can get from Wheels and Wings Hobbies in Toronto.

Once complete it will join my growing collection of Le Mans cars, which will soon require fabrication of some more shelving from Plexiglass sheet to make more room in the display cabinet. No pictures yet, it's not quite done -- I still need to clean up the paint on the glass.

Sunday, March 15, 2015

Mazda 787B: Chassis

Boy, do these Tamiya kits go together fast, especially compared to the resin world. A couple of evenings and a solid weekend has gotten the 787B chassis essentially complete. The big question will be whether to apply the (ugly) decals of the period car, or to leave it orange. 


The 787B is a critical part of my goal of modeling as many different Le Mans engines as possible. A 4-chamber rotary motor, this engine powered the Le Mans winner in 1991. In spite of a lot of effort by Toyota since then, this remains the only Japanese car to win Le Mans.

Next will be the interior and exterior. A couple of older shots (below) show it next to a 956 (also incomplete) and a Lancia Beta Monte Carlo.


Saturday, March 14, 2015

New arrivals

It is well known that the ideal number of model kits on the shelf is n + 1, where n is the current number of kits on the shelf. (It turns out that this is also true of guitars, motorcycles, bicycles, or any other object worth collecting; however model kits have an advantage as they do not take up so much space). That being the case, I have acquired three more resin kits from the French supplier Profil 24.

Two are curbside kits of pre-war racers. The 1926 Renault 40 NM Record was a streamlined land speed record car, maintaining a record 173 km/h average speed over 24 hours. The shape is a lovely Art Deco affair that reminds me of the cars in early Tintin comic books; the skinny wheels and lack of front brakes mean this 9-litre monster was probably a real handful, even with only 130 horsepower. Bodywork from the cowl back was built by Weymann and consisted of fabric (leather, in this case) stretched over a light framework of tubes. Both creaky and leaky, I would imagine; other Weymann bodies of the period used fabric impregnated with airplane dope as a sealant.


The 1938 Alfa Romeo 8C 2900 B that ran at Le Mans is a lovely, curvaceous Italian affair, with a 2.9 litre, supercharged straight 8 making 220 horsepower in road trim; racing output was probably substantially higher. Technology sure was progressing in leaps and bounds at that time, with almost double the power from three times less displacement in just 12 years. Too bad neither kit includes any engine detail.

I took the attached picture of an 8C 2900A in road trim at the Schlumpf museum in Mulhouse, Alsace; the car dates to that fascinating period, style-wise, when designers were exploring the concept of molding front fenders into the body instead of having them standing clear as in, say, a Model A. The museum, which is vast, has a strong focus on the Bugatti collection amassed by the Schlumpf brothers, as well as a wide range of other interesting stuff, and is a must-see if you are ever in southern Alsace.


The third one is the Talbot Sunbeam Lotus that ran at Monte Carlo in 1981; this one has lots of detail around the lovely little Lotus twincam motor. An obscure little car, although one of the drivers was Jean Todt who went on to fame as race team manager with Ferrari.

So at a quick glance,  n is now approximately 50 kits, including stuff that is started, give or take a few. At my current rate of a few cars per year, this will keep me busy for quite some time.

To compound the problem, soon it'll be time to get the bicycles out again. At last count n = 4½ bikes, one each in steel, aluminum, titanium and carbon fibre; the ½ bike is a second aluminum bike shared with my son. So modeling progress may slow somewhat if the snow ever melts.

Friday, March 6, 2015

Alpine A210 final assembly Part II

So it's done. The glass went in OK with the Micro Krystal Klear, and the body is a fair fit to the chassis. Wheels tend to catch in the inner fenders, especially in the rear, and it probably wouldn't roll even if I had gotten the axles right. Looking in through the glass, there are big gaps visible where the inner fenders are missing, and a lot of the fiddly little bits were a challenge. Nonetheless, it's a nice addition to the growing collection of obscure little French racers.


Combined displacement of the two Alpines: 2.9 litres.

I've always thought the A110 was a good-looking little car, with a lot of neat period cues. Of course there are other shapes from the same era that have aged much better, such as the first-generation 911, but this is still an interesting shape with the little lips on the fenders, the scalloped sides and the slim roof pillars. It manages to look muscular even though it is small, because the proportions are all just about right. The road version is probably better-looking because it doesn't have all the tacked-on lamps needed for the Monte Carlo. The Matra Djet was another iconoclastic French design from the same period, which was replaced by the phenomenally ugly 530. But I digress.  


The A210 was designed with minimal wind resistance in mind and it shows. It was succeeded by the A220, with a small V8, and with a similar focus on aerodynamics.

Neither of the Alpines is really painted a proper French blue, with the A110 done in Testor's and the A210 in Tamiya. However the camera, lighting and computer screen play a role here; to illustrate I tried some new artistic photographic techniques. The last picture, which probably reproduces the two shades of blue better than before, is a lot softer with a lot less glare, plus it hides the flaws better. Maybe I'll use this approach more often ...


So what's next, you ask? Hard to say. There are a lot of unfinished projects taking up space. I've built my share of Hemis, small-block Chevys and big-block Fords; I've also built my share of turbocharged, ground-effects Le Mans racers. The obscure stuff is oddly interesting and there are two other French cars sitting on the shelf: the Renault 4 mentioned previously, and Tamiya's Citroen 2CV. Combined displacement 1350 cc from 6 cylinders ... then again there is Tamiya's Mazda 787B Le Mans car with rotary engine. Stay tuned.