Thursday, March 16, 2017

BRM H16: Coolant system and forward chassis completion

Every so often I have an urge to verify just how sharp my favourite kitchen knife is. As a result, I have been sidelined lately by a fairly deep cut to the tip of my left index finger, which has made it very difficult to type entries for this blog, let alone manipulate the microscopic bits associated with this kit. However, I survived with only minimal loss of blood and no infections; no amputations were needed, and the flesh wound is healing nicely. So time to get back at it. A fairly major snowfall also made for a good excuse to stay in the house.

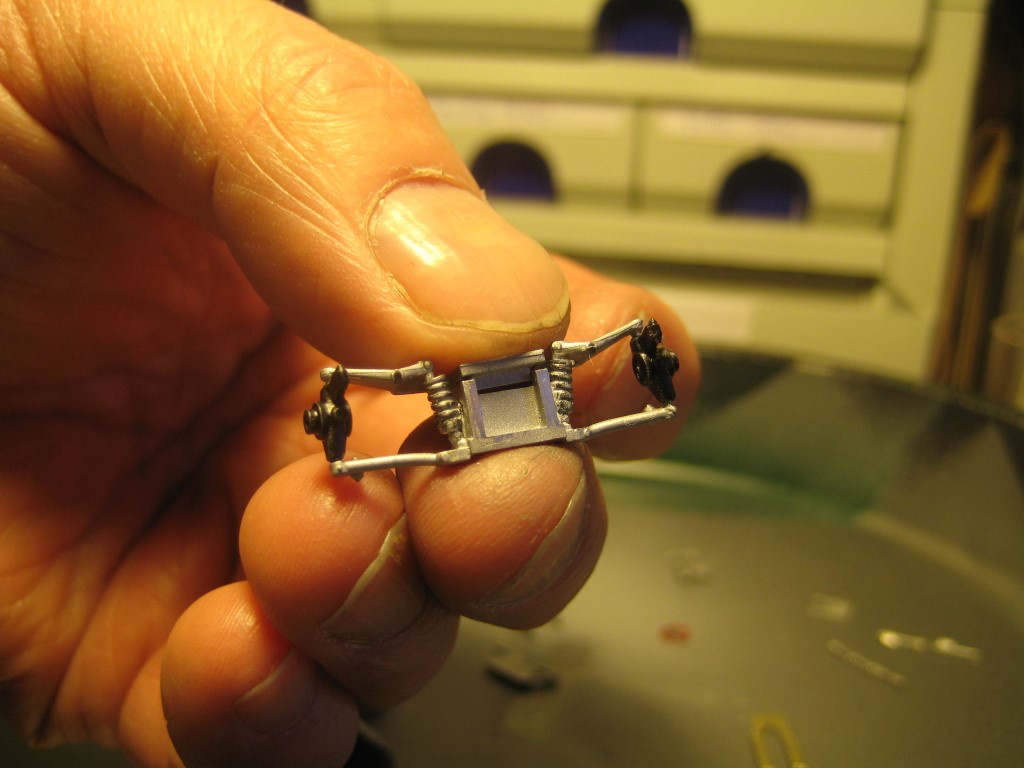
The instruction sheet recommends assembling the two water radiators, complete with little phot-etched brackets and white metal hoses, then offering the completed assembly up to the front of the chassis just inside the nose cone. Looking at it all, I figured that the radiators needed to be supported during all this, and that taking advantage of the dowels and sockets associated with mating these to the chassis floor ahead of the front axle would be the best approach to ensuring these don't move around while said hoses and brackets are attached.


So the radiators went in OK, and only one of the four little photo-etched brackets got lost, pinging off into space. Maybe it will turn up, maybe not; I have been surprised in the past by what has turned up in the scarf and detritus when I clean up, sometimes days later. Hoses all line up fairly well. The critical part is the nose cone which is a tight fit over the radiators and the inboard springs and rocker arms. A lot of filing improved things but there is still a gap. Still you only really see it under the magnifying glass.


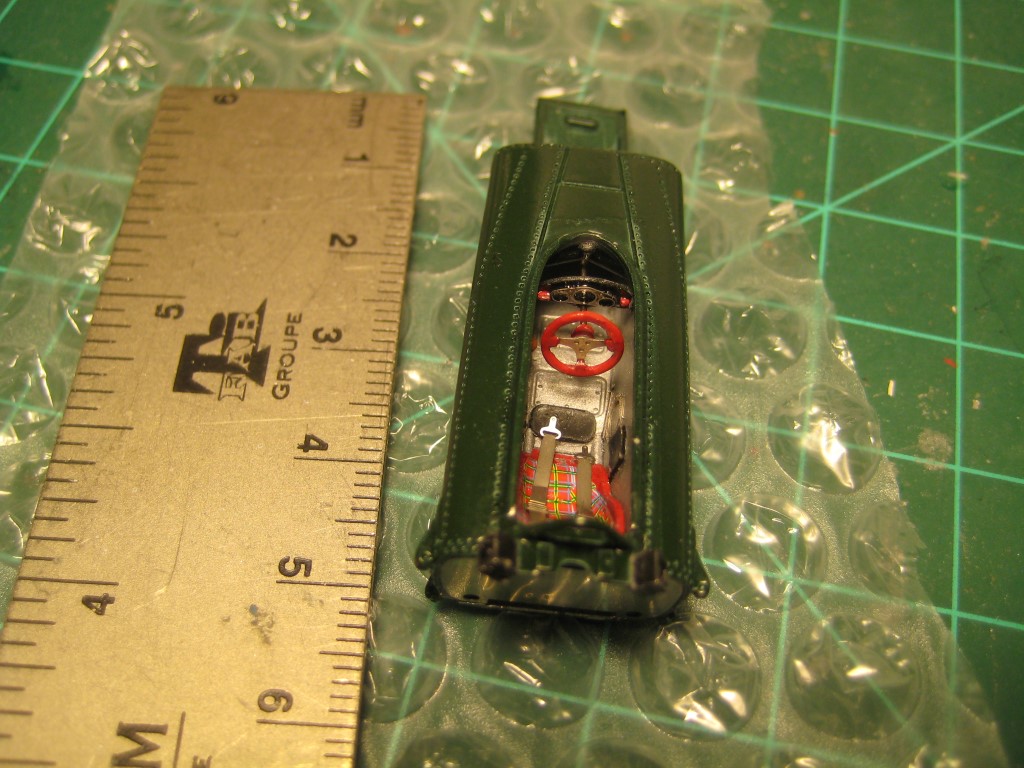
I have been careful to protect the body and other sub-assemblies from accidental damage by keeping them in little pieces of the bubble wrap that the kit came in. So far the paint on the body has stood up well to a fair bit of manipulation, but it is clear I will need to do some polishing before final assembly and decals.


There are people out there who market themselves as master model builders and offer to assemble things like this, at a price. Not having seen 'professional' work, I am not sure how good they really are; and I am not sure how they make a decent hourly rate unless they are really, really fast. And given the price of the unassembled kit, I assume you are looking at sums pushing $1000 to do this professionally, so it is really only for the very wealthy collector without the time or inclination to do it himself.

All in all this is a good build, so far (don't want to jinx it!). So stay tuned, rear suspension is next. This will require assembling little coil-overs with actual little steel springs that actually get compressed slightly, so the opportunities for stuff pinging off into the aether is exceptionally high.

Sunday, March 5, 2017

BRM H16: engine

A couple more hours of concentrated effort got the engine together. This was only moderately traumatic as I only lost two intake trumpets, and both reappeared eventually.


Looking at the various cam covers and whatnot, it looks more likely that the engine is in fact a pair of flat eights, not a set of four flat fours I as surmised earlier; the cam drives all appear to be at the front of the engine. Wikipedia supports this, saying it was a development of the 1.5 litre V8 used in the previous formula.


The zoomed in photo above shows detail that is hard to see, even with the 4X glass: the little BRM badge on the upper exhaust cam cover, the lumpy black injection system between the intake trumpets and driven by a belt off an intake cam, the equally lumpy aluminum water pump driven off the lower exhaust cam. As models go it is very nice but zooming in too far can show a lot of microscopic flaws. (Picture taken with the macro setting on my little point-and-shoot Canon).

Overall, Wikipedia doesn't have much good to say about the motor; it was heavy, complicated and unreliable, and Jim Clark managed the only win with it, in a Lotus at Watkins Glen in 1966. Lotus wisely moved to the Cosworth DFV in 1967, leaving BRM to soldier on with the H16. By 1968 even BRM had given up and had switched to a V12, not that this improved things. Still it's a lovely little oddball.


Overall the kit will be only just over 90 mm in length. As with many kits, it's too bad that much of the motor will be obscured once it is all assembled and ready to display.

I'll be busy with other things for a few days, so no further progress is likely until mid-week. Next will be rear suspension and those lovely exhaust headers. Stay tuned!

Saturday, March 4, 2017

BRM H16: Front suspension installation, and engine prep

An evening in the paint booth got most of the engine and front suspension bits painted. At 1/24, I often do detail painting as I go along, using Testor's enamels and a brush; at 1/43 there is a lot of detail that can get buried in too-thick paint, so I have been planning ahead and spray painting everything at once according to colour. In a couple of cases, sub-assemblies (engine short block and heads, for instance) have been glued up first.


Finding ways of illustrating the scale is always challenging; for example, the engine is actually quite a bit smaller than the picture of it in the instruction sheet. So it seems easy when looking at the instructions, but then you start fumbling with bits because your fingers are just too darn big.


Another three hours got the front suspension assembled and installed. Here I ran into some fit issues, possibly due to mistakes made earlier; a certain amount of grinding of white metal was needed to get the structure supporting the inboard springs to slide inside the leading edge of the monocoque as it should. Part of this was paint but there were interference issues as well.


Another little piece of 0.5 mm wire, used for the leading arms for the lower suspension arm, pinged off into the distance and probably got eaten by Mr Carpet. As assembly progresses, I am hoping that there is excess wire in the kit, otherwise I could run out and get stuck. I may keep my eyes open for 0.015" and 0.020" brass wire as I wander through hobby shops in the next while.


Engine assembly is next. This should be fun, with sixteen teensy-weensy (that's a highly technical term, by the way) little injector trumpets to drop, fumble or otherwise screw up. The clutch housing actually includes a clutch disc, pressure plate, release bearing and fork, so again plenty of opportunities to screw up.


And all this while keeping the CA glue where it belongs (on the joints between parts) and away from places it doesn't belong (my fingers, the tweezers) is an ongoing challenge. All in all, this is great fun! Stay tuned.

Thursday, March 2, 2017

New 1/43 scale blog

OK, I thought long and hard on this one. Do I keep all modeling in one location, or do I break out the 1/43 stuff from the 1/24 and 1/25 scale work. In the end I decided to create a new blog, here: http://43rd-scale.blogspot.ca/

Why? Well, I now have three kits in this scale. The BRM H16 as driven by Jackie Stewart to a second place finish in the 1967 Belgian GP has been described here before. Later I came across a Gurney Weslake which is also an oddball, and which turned out to be the first place car in the 1967 Belgian GP; it was also the only win for the car (driven by Dan himself, who had rather a large number of other wins in other cars, but none in the Weslake). So having the first and second place finishers for the 1967 Belgian GP in hand, it made sense to grab the third place car (a Ferrari 312 driven by Chris Amon) in order to have the entire podium.

So there is a lot of material to come, and a new blog made sense. Have a look and let me know what you think; the H16 is coming right along and there are some interesting photos and stories.


BRM H16: cockpit

My first 1/43rd kit, Model Factory Hiro's excellent BRM H16, was described here, in my 1/24th scale blog. I decided to create a new blog just for 1/43rd kits because there are likely to be a few of them; at this point I have three which reproduce the finishing podium at the 1967 Belgian GP: Dan Gurney's Gurney-Weslake, Jackie Stewart's BRM H16, and Chris Amon's Ferrari 312.

So a concentrated effort got the cockpit of the BRM complete. First step was to wash the spun-cast white metal bits in acetone to get rid of any mold release agents. Some long goobers floated to the surface, so this was clearly a good idea.


The kit is up to the usual Model Factory Hiro standards, with lots of detail. Two pieces of wire (0.5 mm and 0.4 mm diameters), two photo-etched sheets, and assorted springs and machined parts are complemented by loads of spun-cast white metal bits and an excellent full-colour instruction sheet. (There are no resin bits).


The driver's seat was first up, complete with tartan decal (a Jackie Stewart signature). The gearshift linkage involved 14 mm of 0.4 mm rod, the steering column 16 mm of 0.5 mm rod, and all of it needed the 4X desk magnifying glass to see what I was doing. Fit is generally very good, although, as with most spun cast bits, dowels and sockets need to be cleaned up. A decent set of number drills corresponding to 0.4 mm, 0.5 mm and 1.0 mm (#78, #76 and #60) is a bare minimum.


A good set of tweezers is also critical; the original piece of 0.4 mm rod pinged out of my tweezers and got eaten by Mr Carpet. Hopefully there is excess 0.4 mm rod in the kit; failing that I will have to locate 0.015" rod.


Seat belts are photo-etched; I didn't manage to get the lap belts in, but the shoulder belts drape over the seat back nicely. I also skipped the three minuscule decals for the gauges, and replaced them with drops of black paint. Hey, this stuff is really, really small.


While on the topic of paint, it is pretty clear that a thick coat of Testor's enamel is going to hide lots of detail even if you can only see it under a magnifying glass. As a result, I am making an effort to spray everything with Tamiya rattle cans, and may eventually use this as an excuse to get an air brush. The Testor's bottles come out when I need to touch something up, usually where the piece got cut off the sprue. The TS-9 BRG looks good with the naked eye, but the close-ups show all the little flaws.


I am having trouble wrapping my mind around just how small all of this is. When I thought I had lost the steering wheel, my first reaction was to turn to the parts bin ... which is all 1/24 and thus enormous. (The wheel resurfaced, fortunately). But it is very easy to lose stuff, so a very clean work space is essential, and you need to lean forward over your desk so microscopic bits can't fall in your lap.


In spite of the size, and having to peer at everything through the desk magnifier, it is all coming together rather well. Stay tuned for more!

DBR1: Almost done

Progress has been made: the car is essentially complete, missing only glass and decals. Here's the scoop.


Some fiddling with photo-etched hinges got one door to work, sort of, but all the bending to get the hinges in place led to snapping off of one of the pins on the other door. It's all pretty sketchy ... I decided that both doors will be glued shut. It's a roadster, this won't affect the visibility of the interior.


The dash and steering wheel are not installed yet, as I have misplaced the decal sheet, which includes gauges. Profil 24, consisting of a husband and wife team, is a very friendly outfit and they are sending me a replacement. Meanwhile the rest of the car is together and looking relatively OK, given the circumstances. In terms of finish, it is up to my usual borderline level of sloppiness, although the wired engine looks good.


Aston Martin made five of these over a period of several years, culminating in a win at Le Mans (with a certain Carroll Shelby sharing the drive with Roy Salvadori) in 1959. The win helped the company win the sports car championship that year. As mentioned before, disc brakes were a big part of the success, with the small-bore six and De Dion rear end not contributing much. The Italians took over from the Brits in 1960; there wasn't another British winner until the advent of the XJR-9 LM.


As this is my first completed Profil 24 kit, there are a few observations I could make. The kit models an obscure but historically relevant car, which is a good thing. But the fit of most bits is nothing like that of a styrene kit, so a lot of fiddling, fabrication and modification is needed. At the end one hopes it all works out OK. In this case, both front wheels are mounted a little too far back on the chassis, due to uncertainty in where to mount the front axle. This type of error can be mitigated by a complete assembly prior to paint and glue, but some of the more fragile pieces may not survive this process.


Another point to consider in buying resin is that the quality of the instruction sheet can be quite variable. Profil 24's sheets are better than some, but not up to styrene standards. (MFH still makes the best instruction sheets, and their bits all fit well, but their kits are very expensive.)

On the positive side: lots of detail in the engine compartment, and the lovely wire wheels with real wire laces made from photo-etched sheet (as opposed to the poor results seen when making wires in an injection molding process). The photo-etched dash is superb, and there is a lot of room for real craftsmanship to shine here.

So when buying one of these kits, assume you will engage in an artisanal fabrication process rather than mere assembly. If you accept this challenge, you'll be happy, because every little part is an adventure and will provide lots of challenges and mental stimulation, not to mention building manual dexterity.


Overall I am happy with the result; this has been an excellent learning experience and the car looks good. Once I get the decals, I'll finish off the dash and deal with the vacuum-formed glass.

I am not sure what to tackle next; I have interesting resin kits from several different builders, each with their own set of quirks, including two already started from Profil 24. On the other hand, maybe it is time to revisit the 908/03 from MFH; yet again maybe I need a quick styrene build to maintain momentum. The Fujimi Ferrari 250 GTO would be a reasonable followup to the DBR1, especially since I have the Historic Racing Miniatures engine for it ... Stay tuned!