Tuesday, May 30, 2017

Mosquito: more cockpit details

Yes, it has been a while since I posted on this topic -- February, to be exact. I have a range of excuses which I won't bother listing because you probably won't believe me.

I got around to the instrument panel which uses an interesting approach to gauges.

The panel consists of a styrene piece full of holes, and a clear piece with little raised divots that fit snugly into the holes. The idea is that you put the decals for the different gauges on the raised divots, then insert the whole thing through the styrene piece.


The only problem is that the decals can get caught on the styrene piece as they go in, and get turned on their sides. So this all took longer than hoped for as I rescued a bunch of poorly stuck decals. The decal glue being weak, a dab of Micro Krystal Klear helped settle them all down. Miraculously, only one actually got lost, and I'll see about finding something from the parts bin.

The challenges notwithstanding, this seems like a nice approach and I can't help wondering why the mainstream styrene car kits don't use something like this. Even better would be a single decal with all the gauges, on a flat backing, and with a thinner overlay -- putting on 21 individual decals sure is time consuming, and getting them all to line up is a challenge.

Next: a second instrument panel needs to be completed; this one goes on the inside of the fuselage at right angles to the main panel, and has to go in before the cockpit assembly all goes in. This also has a handful of decals on a clear backing plate. It also includes a wiring harness which broke when I tried to clip it off the tree, so some superglue will likely be needed once it is time to install it.


Friday, May 26, 2017

Bonjour les Français!

(Note to English speakers: 44% of my page reads came from France in the last month. Gotta speak to the customers! More English posts will come, so sit tight.)

Bon, je regarde les statistiques, et mes lecteurs proviennent largement de France.

Figure 1: Rally and EU road cars (and an Impala)
Depuis le tout début de ce blogue en février 2014, les français représentent en moyenne 21% de mes chers lecteurs fidèles. Parmi mes autres chers lecteurs fidèles: les lecteurs des É.-U. (23%), de la Russie (!) (18%) et du Canada (17.5%).

Figure 2: Le Mans
Parfait. Je ne sais pas ce que veulent les Russes, mais bon. Je ne me plains pas.

Figure 3: Customs and hot rods
Par contre, pour le mois dernier, le pourcentage de lecteurs français remonte à 42%.

Figure 4. Trucks, Trucks, Trucks
Alors qu'est-ce que vous voulez, vous, les Français, quand vous lisez un blogue comme celui-ci? Je serais très heureuz de dédier à vos intérêts, de temps en temps, des contributions au bloque. Voitures françaises? kits de compagnies françaises (Heller, Profl 24)? kits de voitures Le Mans ou rallye? J'ouvre le dialogue: Communiquez avec moi par le truchement du bouton 'Comments' (pour des commentaires qui pourraient devenir publiques) ou par courriel pour des conversations privées: tbrowne.mtl (a) gmail.com. Je ferai de mon mieux pour vous répondre, en privé ou en publique.

Figure 5. The Japanese collection (and a couple of flat heads)
Vivement la conversation! J'attends vos commentaires.

Thursday, May 25, 2017

BRE 240 Z: engine

Back in November 2016, I completed the BRE Datsun 510, which had been sitting around since February 2016. The verdict: A challenging but very detailed kit that would frustrate a beginner but reward a more experienced builder. Also back in February 2016, I completed the paint for the BRE Datsun 240 Z, which has been sitting on the shelf all this time.


I had been planning to complete both together but other projects intervened.


So time to hop to it and get the engine and chassis done. As with the 510, I decided to wire up the engine. The distributor grows out of the front cover on the left side of the engine, and is poorly positioned for any serious poking around, so I used an 8-cylinder distributor from Preston's Parts (with two wires trimmed off). Careful drilling of the front cover, after cutting off the stock distributor, is needed.


The plugs are well molded and can be used with the little boots available as part of distributor kits from Preston, Detail Master, Model Car Garage or others, but I have never had much luck with these, so I cut off the plugs and drilled through into the head instead, inserting the leads into the heads as far as necessary. If you drill clean through into the cavity inside the engine block, you don't have to worry about trimming wires to the correct length only to make them too short.

The Nissan 240Z OHC script on the cam cover can be brought out with a bit of gentle sandpaper after putting on a coat of gloss black, but is not as clear as in some other engines I have built.


The carbs come with a one-piece throttle linkage (a nice touch) and with holes predrilled for fuel lines, so I went for it.


One important point: the kit comes with bits for a street version of the 240 Z (which I don't recall seeing); so the plated reproduction of a stock exhaust manifold is not needed.

Next will be various chassis and interior bits. So far this is an excellent kit without excessive frustration if you build it straight out of the box, but offering opportunities to build in more detail if you feel like it. Stay tuned!

Friday, May 19, 2017

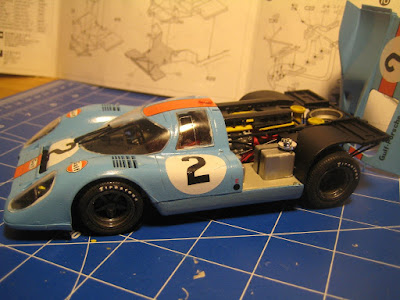
917 K Gulf Oil: Complete

OK, enough with the trucks, back to the good stuff. The 917 just needed final assembly.


But first I spent a fair bit of time with a polishing kit to try to get rid of the orange peel in the paint. I got a lot of it out, but it's tedious; plus I wound up going through to the primer in a couple of places. So the lesson is: avoid orange peel in the first place.


So the paint is a bit sloppy, and this is certainly an area where I could be doing better going forward. Decals went on OK, glass went in OK (the white Micro Krystal Klear glue still shows here as it hasn't completely set).


The HRM motor sits in there nicely, taking up over half the wheelbase. What a monster. I've ordered another motor to build up as a separate display unit. (The Fujimi motor is very basic and takes advantage of the fact it is all hidden once assembled.)


Comparison with the 956 is interesting. Water cooling is a big difference. The 917 managed about 100 hp per litre on air cooling alone. There is an upper limit to this, however, due to the fact that heat transfer coefficients from an aluminum head to air are at least one order of magnitude less than to a liquid. So you need huge surface area in the form of finned cylinders and liners, or you use liquid cooling and move the finned area elsewhere, such as into the door frames as seen here in the 956. The radiator surface area needed in the 956 is substantial, and this is just for the heads -- the 956 motor still had a big fan for the cylinder liners. Of course in a 956, there is something like 600 hp from substantially less than 3 litres, so more than double the specific power of the 917.


All in all a good kit, the HRM motor is an excellent addition, and I probably could have been a bit tidier with it all. Lessons learned will serve for the other four 917 kits on the shelf ... Completion ratio is now a whopping 33%.

Dodge L700 Complete

The L700 is now complete. Final assembly took longer than expected with lots of little problems to solve in the last stages.


What a fussy kit! Loads of things don't fit, the instructions are vague and poorly drawn, and I could go on. I'll skip most of it and just mention the most frustrating problem, which was the front wheels. With a 7/64" hole, they are supposed to fit over a 5/64" axle shaft. This required making a pair of sleeves from styrene rod and drilling the wheels out to 1/8".


The doors fit reasonably well, which is good because this is a traditional problem with this kit. The cab hinges operate well, although the cab is clearly a bit crooked, due to the hinge mounting blocks not fitting quite the same on both sides.


The engine was pretty low on detail, but the big gearbox looks fine. The steep driveshaft angle is due to the short wheelbase and one has to wonder about universal joint life in the real world.


Anyway it's done. It's an interesting shape and will sit nicely on the shelf with the Freightliner. The eagle-eyed among you will notice that the license plates, which came from my boneyard, are Minnesota 1960, which is not possible given it's a 1969 model, but what the heck. Next will be to decide on a trailer; the Little Red Wagon trailer is ugly but I might hijack it if I can find a copy of the Italeri 20' shipping container at a reasonable price. Decals for a haulage company would then be needed.


The completion ratio has now moved from 32.1% to 32.6%. Among the trucks on the bench in various stages of progress are the Ford LN 8000 where I am trying to find a mid-50s Ford COE cab, a Freightliner chassis with an Allison V12 in it, and a Mitsubishi Fuso tractor that goes with the car carrier I finished some number of years ago. Loads of other stuff, too. Stay tuned!

Thursday, May 18, 2017

Dodge L700 assembly part I

Progress is being made. The doors have been hung and are not too bad in terms of fit. I built this kit as a teenager and remember fighting with the fit of the doors.


It was still not easy 45+ years later. There is a lot of trial and error required because nothing is pinned or doweled, and because the instruction sheet is a paragon of obfuscation. Rear view mirrors are a case in point. Glue it in wrong and you are in trouble. (Same goes for the A100 pickup).


At this point, however, the doors seem to fit, and the cab slides over the interior OK, so maybe all is well.

The chassis is essentially complete. One major challenge was that the rear axle, which is one of the few items pinned to its mating part (the springs), sits much too far forward, and the driveshaft is too short. Either I put the axle in backwards (not possible, really) or I put the springs on backwards (unlikely, given the picture, which admittedly is pretty poor). We'll see how it all fits once the rest of it goes together.


It certainly deserves the 'cab-forward' moniker -- perhaps the stance is a little too aggressive, but it looks good. (The forward positioning of the rear axle isn't helping the stance any.)


Final assembly will be tomorrow once the coat of clear sets, but I can tell you right away that this is not really a kit for beginners -- the amount of fiddling about which is required is well beyond the usual AMT or Revell kit. This applies to the A100 pickup truck as well. Still, it provides a model of an iconic '60s cab-forward design, and so is worth it if this sort of thing is of interest. And once the doors are on, it is nice to be able to show off the interior.

Nissan R89C with metal engine bits

I got my hands on a Hasegawa kit of the R89C, with the engine molded in white metal instead of the usual styrene.


A head scratcher, this one! I had no idea Hasegawa did this sort of thing. The other Hasegawa kits in my collection tend to have little or no engine detail, with the old Honda RA 272E being perhaps the best detailed of the lot, which isn't saying much. (Many years ago, I built up the R90C made by Tamiya, which still looks pretty good today even though I spent no time on the outward appearance.)


Rummaging around on eBay, I found a Ferrari 642 in the same series, as well as several aircraft at various scales other than 1/24. Gunze Sangyo had the high-tech series but I was unaware of Hasegawa's efforts in this area. I'd be curious to get a listing of what they made.

Inside the kit it looks a lot like the similar Tamiya kit, except for the blue box occupying one end of the kit. Opening this up, it was full of baggies, each with a selection of spun-cast bits. (Be careful if you go this route - at least one baggie had torn over time and the bits in it spilled out onto the floor. Hopefully I found them all...).


There are also some metal rods, and the thickest bit of photoetched sheet I have ever seen. Slab would be a better word than sheet, and this is nice because these bits model the rear subframe and suspension parts, so getting it all straight should be relatively easy.


Also delivered today was a Johan kit of the 1968 Chrysler 300 hardtop. I've always thought this was a particularly striking car, appearance-wise, and I'd been watching for a clean one for some time. I intend build it up as close to stock as I can.

Right, enough about new purchases, time to get back to building! The completion ratio (kits completed divided by total kits on hand) is not getting any better.

Saturday, May 13, 2017

Dodge L 700 cab

While waiting for info on the Mill City Replicas Ford COE, I decided to tackle a forward-control cab from the shelf: the Dodge L700 from Lindberg with the notoriously tricky doors. (Yes, I will get back to the 917 shortly).


The paint needs a bit of cleaning up, but the black with red trim looks good. The front axles appear to be way too long and will be needing a trim.


What a stubby little thing! It makes the Unimog look enormous. Mind you the Mog is 1/24 and the L700 is 1/25, but still.


It's been an easy build so far. Final assembly is still to come, though, and this is where the fight with the door hinges will arise. I built the Little Red Wagon, with similar hinges, some time ago, and I recall that nothing fit, which is why I posed it in the display cabinet with the door open :).


This particular kit came from the Little Red Wagon team combo, so I have another unbuilt A100 as well as a trailer. Next will be to decide if I am going to build up the A100, and if so in what form. I've got a van body for it from Jimmy Flintstone, but I expect this will entail the usual headaches in getting it to fit. I've also got a slant 6 from Ross Gibson, but it would be a shame to build this up and then hide it under the engine hump where it will never be seen again. Stay tuned!

Saturday, May 6, 2017

Ford LN 8000 COE crew cab

I had been thinking for some time that the LN 8000 race car hauler from AMT would look good with a crew cab conversion, particularly a '50s COE crew cab which would not entail quite as much shortening of the car ramp as would be the case if I lengthened a conventional cab (such as the LN 8000 cab). After all, your race team includes more than two people, right? The example below, found on the Internet, consists of two cabs with the second one mounted front to back.


Coincidentally, I have, in the parts bin, a Jimmy Flintstone F100 COE crew cab resin body, so I started fleshing out what would be required to mate the two. My spare '53 F100 kit would provide any needed bits like interior, etc. The conversion would entail shortening the storage lockers on the car ramp, but that would be easy.


As with all 'simple' plans, the devil is in the details. It turns out that the cabs are about the same width, but the front fenders need to be wider by 7 to 8 mm on each side if the F100 is to clear the truck tires. Also, the wheel well openings would need to be hogged out.


Finally, the cab sits nicely on the frame but the LN 8000 diesel motor does not fit in the engine bay, and a lot of work around the cab's inner fenders would be needed to get it all to coexist.


Members of the Model Car List on Yahoo Groups suggested finding a more appropriate resin body. The Rocket Fin website lists a 1953 C-600 cab from Mill City Replicas that would just need a second cab and some sheet styrene to extend it. And the F100 crew cab could go on an extended chassis from my '53 F100 kit.


Seems that Mill City Replicas has no online presence, so I sent off a letter (yes, an actual letter, with an actual stamp and everything). We'll see what comes of it. Meanwhile, I finally got my hands on a couple of cans of Testor's 1208C Light Blue, so it is back to the 917.

Tuesday, May 2, 2017

917 K Gulf Oil: Chassis and HRM motor completed

As with the front space frame, the Fujimi kit mimics the rear chassis of the 917 K well. The downside is there are lots of flexible little struts needing to be put together just right.


The only issue with the HRM resin bits was a couple of instances of the cyanoacrylate glue being reluctant to join a styrene strut to a resin crossmember. I don't recall this being a problem in the past, but then I have rarely needed to join resin to styrene. Maybe epoxy would be better here.


The complexity rivals Tamiya's lovely 300 SL chassis; the Tamiya effort was easier to put together because the styrene was somewhat stiffer (perhaps the specific styrene formulation, perhaps the struts were a bit thicker), and because of decisions made by the mold maker as to which sub-molding should include which specific strut. In any case neither is for the faint of heart, but the 300 SL is easier to get right. (See pics of the 300 SL here).


One issue, as always, is how much of it all disappears behind various shrouds or other "sheet metal" bits. For example, most of the spark plug wiring is invisible once the air cleaner assembly is added to the top of the injection stacks. A shame, really, given the effort on the ignition, but hey, you and I all know it's there, so that's sufficient.


All in all a very challenging kit that will reward a seasoned modeler, but will frustrate a beginner. The HRM motor does not add any complexity as everything fits well, but be aware the instructions are quite terse and require some significant study. Access to reference material, online or otherwise, will be useful. I had a look at the instructions for their Cheetah and can imagine a careful pre-assembly will be needed to be sure to get the sequence right.


Next: put in the dash and a few added bits around the rear (inner fenders, rear lights), then wait for the paint on the body to harden enough for some polishing.


It's coming together. Stay tuned!

Monday, May 1, 2017

917 K Gulf Oil: Chassis and HRM motor

The Fujimi rendition of forward chassis bits is quite detailed and shows a structure very much akin to the 908/03 chassis, perhaps not surprising given that both cars were run in 1970, the 908/03 on twisty circuits like Nurburgring or the Targa Florio, the 917 on faster circuits like Le Mans or Daytona. The cockpit is clearly scary, though, with the driver's feet well forward of the front axle centreline.


I washed the Historic Racing Miniatures bits in alcohol but this did not seem to result in any major amounts of mold release agents floating in the washing up, so I assume this level of cleanliness is part of the service when you pay for one of their kits. The resin is of good quality and flash is minimal, and the only issue is that some of the larger flat bits, like the bulkhead, are a bit warped. One of these days I'll get around to their Cheetah...

The HRM instruction sheet is pretty high-level and having reference material, either in the form of pictures from the web or, as in my case, access to the instruction sheet for the Model Factory Hiro kit, is useful if not critical. The distributors come predrilled as do the heads: there is nothing like a nicely wired ignition system. The injection pump is also predrilled but I will skip this due to lack of space and the relatively large diameter of the wiring available to me.

Here the left side is complete, with wires running through the injector stacks between the fan shroud and injection pump. Twin-plug heads were something of a fad at the time; I suspect that better ignition systems, combined with a realization that 4 valves per cylinder breathes better than 2 and only leaves room for one plug, was a large part of the end of this. The right side distributor wiring is a lot simpler given it doesn't have to snake around the fuel injection pump.


The completed engine looks good, although as always photos taken this close up show flaws that won't be visible once the engine is in the car. The main point is that the plug wires, from Model Car Garage, are a bit thick at 0.021" (over half an inch at scale).


The photos below contrast this 4.5 litre flat 12 with the 3 litre flat 8 from the 908/03. The earlier 2.2 litre version of the flat 8, as in the 907 (click here), has the fan mounted on top of the crankcase, as does the 4.5; the 3 litre has it driven off the nose of the crank as with all aircooled 911s and most other aircooled Porsche racers of similar vintage.


Fuel injection pump location and distributor drive locations also varied from car to car. Again the layout of the 3 litre is closest to that of early 911's, up to and including the 2.7's.


Another interesting point is the final drive which is located just behind the clutch in the 917 but at the end of the gearbox in the 908. Perhaps this is one way to maintain similar wheelbases with four extra cylinders?


One interesting point from a kit-building perspective is the relative weight of the wiring in the MFH kit, which, at about 0.016" diameter, is a reasonable 3/8" at scale. Finding suitable plug wiring remains an issue and will continue to be a problem as the 24 plugs in the 917 motor required almost one and a half packages of MFG-3002 wire.

The chassis tub, along with the body, has been resprayed in the lighter shade of blue, so I am going to let it all set for a few days to avoid leaving a fingerprint in the paint when I rest my fat thumb in the roof panel. The engine will get exhaust and suspension bits, then get set aside until the paint is done.

Incidentally finding Testor's spray paints is becoming more difficult, at least in my neck of the woods; when I do find some, I'll stock up on the 1208C because there are a few Gulf Oil cars in the pipeline. This will, unfortunately, require a trip to the 'burbs.