There is a bit of paint to fix under the hood. As I don't have an airbrush, I'd have to do a lot of taping to use the rattle can. Instead, I added some white to Testor's gloss light blue to get pretty close with the brush (not shown in the picture). Also the long air ducts from the radiator bulkhead to the firewall don't fit, because of the injection intake horns on the left and the 6V (!) battery on the right.
The reason for all the replacement parts (firewall, inner fenders, dash) in the resin kit is slight differences between the resin and styrene underhood areas, mainly associated with the body. Same goes for the hood. I assume the resin molds need to be thicker than styrene, for good filling and stiffness if nothing else. So there are a lot of spare styrene bits, not just the body.
The stance is fine, and the body colour on the steel wheels is also fine. I had toyed with black, possibly matched by black bumpers (to come), but I think this works. (The resin kit comes with unchromed bumpers.)
The front wheels are the stock steelies from the AMT kit, while the rears are the chrome rears from the drag version, dechromed and painted. Tires are also big in the fender wells, and the body cleanup will be my last chance to hog them out a bit. After final assembly, the body will sit a bit lower on the left side than in the photo, improving the stance. I'm still of two minds around the baby moons.
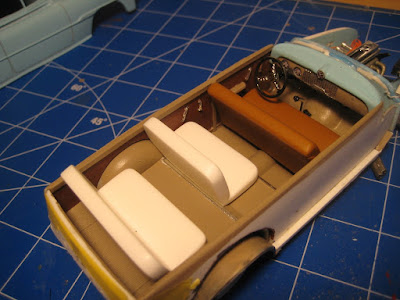
The interior is also complete. I'm going to stick with just the front bench; the resin kit comes with three seats (as shown) which doesn't leave much room for luggage. A luggage rack perhaps? The tan is OK but in retrospect I might have gone for something a bit darker than the Model Master Flat Fabric Tan. And the dash is a bit sloppy but it will do.
Next is the long boring part: all the sanding, filling and painting to get the exterior up to snuff. A lot of sanding is needed first to smooth it all out, then I'll need to paint on the external wood. This will consist of two shades; the darker will probably be Testor's 1185 Flat Rust applied with a brush. The lighter one will probably be Model Master 1735 Wood, again with a brush, which is a bit darker than the Flat Fabric Tan I used inside. There are some gorgeous restoration jobs on the Interweb, but I am not sure how to make the wood grain look realistic.Finally this will get taped and some more of the baby blue shade will get sprayed on. Still to decide: Bare Metal Foil or chrome silver paint for the trim. Probably the rear fender kick panels will get painted because of the risk of wrinkling the BMF over the large-surface, compound curve, but probably the rest will be BMF.
Stay tuned!


No comments:
Post a Comment